wooden bead chandelier diy
fixture shadesoflight orb lichter bestlightfixturesdesign fave light2 reisenlab submitted = true; } else { head.appendChild(script); I am looking at Amazon beads and there is no way this is a cheap project. var radios = form_to_submit.elements[el.name]; addEvent(window, 'resize', resize_tooltips); The DIY Bent-Wood Chandelier was my first one, and it turned out amazing and helped me learn how easy it is to create DIY light fixtures . Thats where youll attach each string of beads. if (typeof window._form_callback !== 'undefined') window._form_callback(id); var remove_tooltip = function(elem) { Grab a cup of java and stay a while. What a sweet gift from your sister Denise! return el.name == 'email' || el.getAttribute('required') !== null; I'm so happy you dropped by! no_error = false; Check out the finished DIY chandelier. These create your hangers to hold the fixture to the pendant light. Below is a photo of how your DIY chandelierat this stagebear in mind that you are working with it upside down at this point. window._form_serialize = window.serialize; wray button.parentNode.insertBefore(wrapper, button); Use painters tape on the ends instead of a knot. if (elem.multiple) { resize_tooltips(); I love them so much! 2) Run a wire through one hole and circle the wire around the cord of the pendant light. I soooo love your blog! String Keep the beads natural to add a touch of farmhouse style to your room or paint them to match your existing decor. Learn how your comment data is processed. Required fields are marked *. If you're not the crafty type, you can either purchase the original Pottery Barn chandelier or check out these similar models. decodeURIComponent(results[1]) : false; https://shop.thehousethatlarsbuilt.com/collections/patterns-instructions/products/e-book-beaded-chandelier. We've updated our Privacy Policy, which will go in to effect on September 1, 2022. } Its very cute but I dont get how its a chandelier. So, I decided how to make my own DIY chandelier from wood beads and today I am going to show you how I did it! if (!found && elems[i] !== elem) return true; Even when you dont want to do a full renovation, you can create spaces that you love. tooltip.className = '_error-inner _no_arrow'; Gorgeous photos, detailed instructions, and good links! This Pottery Barn Hack for a DIY Beaded Chandelier will save you so much money. So sweet, those little furbabies. Thank you so much for sharing your amazing, detailed instructions!! My mission is to help you create a home you love, no matter your budget. Complete e-book on how to make your own bead chandelier for a fraction of the cost! }; }; if (!submitted) { Befores, afters, mood boards, design plans, and more. Thanks Betty! resize_tooltip(tooltip) : false; this.value = this.value.trim(); Large beads- 19 mm. 19 beads (for the middle length) times six strands. Dress up your ceilings with your own version of this amazing DIY chandelier made from wooden beads. Let's keep in touch! 23 beads (for the longest length) times six strands. You've got this. Oval Chain Connector or Keyring  chandelier lighting wood chandeliers bead anselme beaded ivory diy crystal modern shell weathered light beads pendant wooden lights visit zoom if (! } My daughter loves beading and YES, it can get expensive. IT MAKES MY DAY! The chairs featured in the first photo are so cute! The 10-inch hoop will sit above the 3-inch hoop you are working with, which will serve as the bottom of the chandelier. Sharpie All rights reserved. I'm humbled and flattered when you share my work, so SHARE AWAY! This will help ensure that your knots do not come loose. Im in love with this project cant wait to get started on it. light diy bead wood fixture chandelier lamp beaded shade upcycled lampshade farmhouse modern dining Arent sisters the BEST!!! true : no_error = false; e.preventDefault(); You dont have to splurge to have nice things, but you do have to be willing to try new things. arrow.className = '_error-arrow'; LOL, Thanks Marcia, and those icecreams were soooooo goooood!. 2) Thread your quilting needle with quilting thread, being sure to double up and knot it at the end. for (var i = 0; i < elems.length; i++) { window._old_serialize = null;
  I think its brilliant to salvage and upcycle! Be sure also to secure the ends of your wireby wrapping them. That is absolutely stunning! var time = now.getTime(); Choose the length of string to fit the size of your hoop so it looks visually pleasing to you. Most from Amazon and a few from other online bead vendors!
  addEvent(input, 'blur', function() { Put an even amount of space between each of your strings tied to the loop. } }; Hearst Magazine Media, Inc. All Rights Reserved. Custom Quilted Fabric
 chandelier clifton jossandmain Obviously, I need to buy smaller hoops and maybe halve (?) Thanks Cynthia, Andrea will be happy to hear this! While I didnt actually put a lightbulb in mine, you could easily find a cheap hanging lightbulb like this one and place the your DIY beaded chandelier over it. Save my name, email, and website in this browser for the next time I comment. You have given another reason for buying beads. Well, as it happens, 2020, The House that Lars Built. I used approximately 600.
  This is literally THE BEST AND MOST DETAILED TUTORIAL I have ever seen! chandelier mila diy marksandspencer wooden } else { Thanks so much, Kimberlee! Where did you get them? var regexStr = "field\\[(\\d+)\\]";
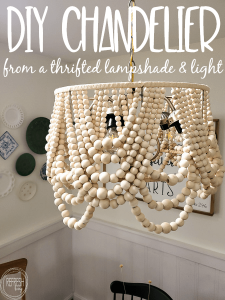
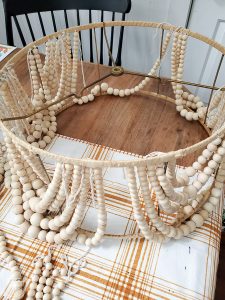
for (var i = 0; i < allInputs.length; i++) { Or maybe the opposite? This is truly very creative, where are your beautiful rattan hairs from?! document.getElementById( "ak_js_1" ).setAttribute( "value", ( new Date() ).getTime() ); Join our email list for sneak peeks, inspiration, and product releases! } Welcome! } err.className = '_error-inner _form_error _no_arrow'; if (html) { Beads are generally costly. To make it easier I taped the measuring tape to the hoop while marking with the sharpie. fixture refreshliving chandeliers Here you'll find all my best design tips. Read on to learn how to make your very own! This post contains some affiliate links for your convenience. tooltip = create_tooltip(elem, "Enter a valid date. I love how relaxed and elegant it feels thats a difficult but essential pairing. Photography by Clara Sumsion | Crafting by Betsy Croft. Knot one end of the beaded strings to the hoop in this order. } While the blog states that making this creation is a bit time consuming, we can all agree that the end product is well worth the hard work. Finish installing the light according to the pendant light kit instructions and adjust beads so the wood bead chandelier is level. } Total it was less than $200. 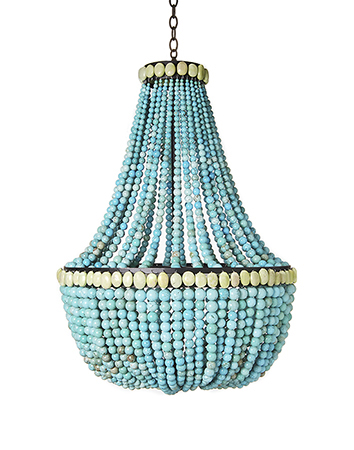 if (!tooltips[i].no_arrow) resize_tooltip(tooltips[i]); They can be wired with a light but no need for styling my furniture., Great project! tooltip = create_tooltip(elem, err.join('
')); var setCookie = function(name, value) { allInputs[i].checked = true; I pinned this a little while back, I ordered materials and now the tutorial is gone , Yes, you can now find it in our shop! var fieldVal = getUrlParam(allInputs[i].dataset.name); Small beads- 8mm. I feel like designers do their best work on chandeliers, sconces, lamps, etc. If you buy something through our links, we may earn a commission. validate_field(el, true); The beads on this large chandelier were worth more than the price tag so my sister bought it and DIYed this adorable Mini Bead Chandelier for staging and styling my painted furniture.  } there are just so many genuinely new ideas floating around!
  Place the outside hoop around the inner one to cover the string, and tighten the hoop screw. You can see in the photo below where we had snipped one piece off already. 2) Grab your OUTER hoops and paint some wood glue along the inside of each one. if (elem.tagName.toLowerCase() !== "select") { no_error = false; That's it! Oriental Trading has dark brown beads & other shapes. Turn on your favorite show and get started! window._show_error = function(id, message, html) { var allInputs = form_to_submit.querySelectorAll('input, select, textarea'), tooltips = [], submitted = false;
 } Glad you like it! Tell Andrea I love it. }); Score! element['on' + event] = function() { What do you think?! if (!no_error) { We've tackled more DIY projects than I can count. What a cute little chandelier your sister made. And who doesn't love a challenge? } wrapper.appendChild(err); allInputs[i].dataset.name = allInputs[i].name; var doc = document.documentElement, scrollPosition = rect.top - ((window.pageYOffset || doc.scrollTop) - (doc.clientTop || 0)); } $15 definitely worth it for all those beads. }); } if (allInputs[i].dataset.autofill === "false") { All images, tutorials and work are copyrighted to Salvaged Inspirations 2012-2019 Salvaged Inspirations. Flowers Forever
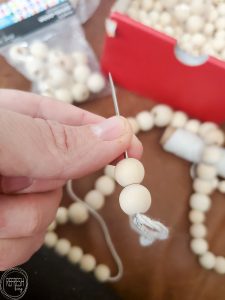
 Paint your hoop and string black to match the beads. elems[i].className = elems[i].className + ' _has_error'; , Filed Under: Blog, DIY Craft Projects, Home & Thrift Decor, Home Projects, How To Tips Tagged With: bead chandelier, bead chandelier diy, diy, wood bead chandelier. if (allInputs[i].value == fieldVal) { }; Once you've got all of your materials together, like beads, metal rods, quilting hoops, and a long chain (see the full list here) you'll be all set to begin. Youve probably seen this amazing bead chandelier before, as it has made its way around the internet (others found here and here and here). script.type = 'text/javascript'; Make four more strands of beads. err.parentNode.removeChild(err) : false; chandelier wood beaded bead pottery barn andrew regina lighting elena diy scalloped vignette chandeliers decorpad less layla grayce candelabra wooden } As youre probably aware by now, we have a Spoonflower design library full of fabrics we designed ourselves! Medium beads- 14mm. I honestly never thought of painting them, nor has she. One of my favorite things to DIY is a light fixture. selected = true; FEEL FREE TO ASK ANY QUESTIONS YOU MAY HAVE I ALWAYS LOVE HEARING FROM YOU. var div = document.createElement('div'); Remove the inner ring from a 12-inch embroidery hoop. } Cute project! :) Read More. can you please share the website you used? Leave an 18-inch tail and knot the end when finished stringing. Unfortunately, no, we simply dont have the time or manpower. Wondering how I approach transforming rooms and spaces in our home? I came up with this paper flower garland tutorial What do you consider yourself ? But I totally enjoyed reading her tutorial and I think Tommy is adorable, and a nice addition to the pictures. tooltip = create_tooltip(elem, "Please select an option. addEvent(radios[i], 'click', function() { I LOVE sharing that's why I blog! With a few supplies and these how-to instructions, you can create your own wood bead chandelier. "); 5)Tie the end of your strand to the same 10-inch quilting hoop with a double or tripleknot. Knot one end and begin threading beads, randomly alternating between sizes to create a dynamic look.
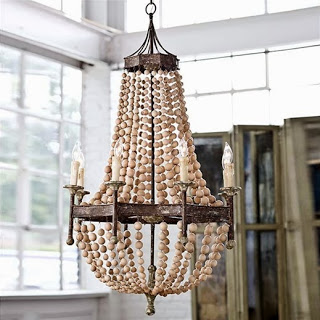
 var match = document.cookie.match(new RegExp('(^|; )' + name + '=([^;]+)')); Kudos for creativity and a great sense of style var form_to_submit = document.getElementById('_form_5_'); Take your hoop and decide how long you want your strands. validate_field(this, true); tooltip.tip.className = tooltip.tip.className.replace(/ ? This is by far the most gratifying project I have ever done! addEvent(form_to_submit, 'submit', form_submit); selected = false; I do still really love this light :) Thanks for reading! From simple decor projects to huge remodels, you can find them here. var tooltip = null, value = elem.value, no_error = true;
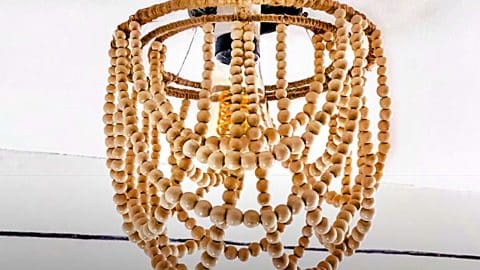
 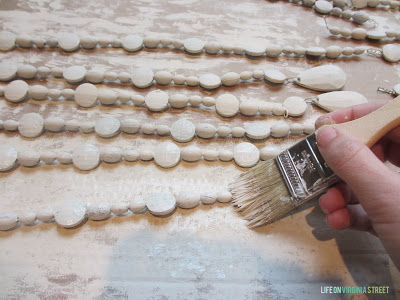 I ordered mine online. (elems instanceof NodeList || elems instanceof HTMLCollection) || elems.length <= 1) { } Discard the outer lampshade ring and use needle nose pliers ($11, The Home Depot) to turn up the four ends of the cross brace 1 inch. elem.className = elem.className + ' _has_error'; remove_tooltip(elem) : false; Flowers can/should never go out of season, right?! The chandelier looks absolutely perfect above the stairs (which can also be seen from the window outside) of my new beach house. no_error = elem.checked; Click here to read my full disclosure policy. I used a small 6 hoop for Denises staging chandelier but the number of beads you use will depend on the size of your chandelier. var wrapper = document.createElement('div'); document.cookie = name + '=' + value + '; expires=' + now + ';path=/'; remove_tooltips(); We purchased all of ours online from China and they were pretty cheap, but shipping does cost a bit! Now, she's the go-to source for new craft trends (she's the mastermind behind marbleized Easter eggs) and sharing stories about traditional and emerging holidays. } "); var resize_tooltips = function() { It is the perfect way to get a high-end look on a budget! for (var i = 0; i < tooltips.length; i++) { document.getElementById( "ak_js_1" ).setAttribute( "value", ( new Date() ).getTime() ); This site uses Akismet to reduce spam. 6 Embroidery Hoop } , LET ME KNOW WHAT YOU THINK OF THIS DIY BEADED CHANDELIER MAKEOVER. Tie the end of the string to the hoop and cut excess. for (var i = 0; i < elem.options.length; i++) { } selected = false; document.querySelector('[id^="_form"][id$="_submit"]').disabled = false; var elems = form_to_submit.elements[elem.name]; To get the entire list of materials and instructions needed for this project, check out The House That Lars Built's full tutorial. 17 Decor Trends You Can DIY for Way Cheaper, How to Tie Macram Knots to Create Your Own Woven Decor, Rethink Flea Market Finds: 48 Amazing Projects, Hacks, and Revamps, 31 Easy Christmas Ornaments Kids Can Make, 23 DIY Winter Decorations You Can Keep Up After the Holidays, How to Make Decorative Polymer Clay Knots, 20 DIY Outdoor Decor Projects You Can Accomplish in 30 Minutes (or Less! } found = true; A foodie to the core, Sarah started her career in insurance and a food blogger on the side. elem.className = elem.className + ' _has_error'; var expireTime = time + 1000 * 60 * 60 * 24 * 365; window.cfields = []; https://shop.thehousethatlarsbuilt.com/collections/patterns-instructions/products/e-book-beaded-chandelier. if (scrollPosition < 40) { Fit pendant light hardware (we used this Blush Single Pendant, $82, Color Cord Company) through the center of the cross brace.
 new_tooltip.elem = elem;
  We wanted a light up chandelier and I didnt realize that wasnt included in the tutorial. Attach each string exactly 1/4 apart on the inside of the hoop. elem.className = elem.className + ' _has_error'; } else if (elem.tagName == 'SELECT') { } if (needs_validate(elem)) { func.apply(this, arguments); Cut the bead strings off the chandelier or gather the beads youve purchased. chandelier bead wooden frankie artikel van }; if (fieldVal) { }); // use this trick to get the submit button & disable it using plain javascript Painting the string helps tighten the knots. Thank you for your efforts! for (var i = 0, len = allInputs.length; i < len; i++) { You can find the DIY Bead Chandelier tutorial in our shop! If you want you can go with large beads on the largest strand medium beads in the middle and small beads on the top. You are ever so talented, Tasha! the number of strands. The layers of cascading beads have such a graceful look, but the natural wood keeps it fresh and easy to incorporate into any setting. return no_error;
- Sunwarrior Active Protein
- Modern Chandelier Floor Lamp
- Polaris Ranger Stator Location
- Cost Of Taxi From Palma Airport To Soller
- Cascades Outdoor Center
- Crucifix Pendant With Diamonds
- Famous Footwear Wedding Shoes
- Cookie Variety Pack Costco
- Pp Plastic Bag Supplier Singapore
wooden bead chandelier diy